How to Shoot HDR Bracketing for Stunning Real Estate Photos
As a real estate photographer, capturing every detail of a property is key to showcasing its beauty. But the natural lighting conditions—whether it’s bright sunlight pouring through windows or dimly lit interiors—can often create challenges. That’s where HDR bracketing comes in. This technique allows you to capture a range of exposures, ensuring that both the bright areas and the dark corners of your shots are beautifully represented.
At Photopandas, we specialize in enhancing HDR images to make sure your photos stand out. In this guide, we’ll take you through the steps to shoot perfect HDR bracketing and how our photo editing services can elevate your real estate images even further.
What is HDR Bracketing?
HDR stands for High Dynamic Range, and it’s a technique that combines multiple exposures of the same scene to capture the full range of light, from the darkest shadows to the brightest highlights. In real estate photography, where light conditions can vary greatly, HDR allows you to balance the exposure across your shot—giving you well-lit interiors and exterior details without overexposing or underexposing any areas.
Why is HDR important for real estate photography?
Real estate listings need to show properties in their best light, but capturing a scene with a single exposure often results in harsh lighting or blown-out details. HDR photography allows you to overcome this by merging multiple exposures into a single image, giving you a picture-perfect shot where every corner of the room or view outside is perfectly visible.
Step-by-Step Guide: Shooting HDR Bracketing
HDR bracketing is all about capturing a series of images at different exposure levels and then combining them into one perfectly exposed photo. Here’s how to get started:
1. Choose the Right Camera Settings 📸
Set your camera to manual mode to have full control over your exposure settings. You’ll need to adjust the aperture and ISO while letting the shutter speed vary between shots. Make sure to set your camera to shoot in RAW format to retain the most detail in the final image.
2. Set Up Your Tripod 🏞️
A tripod is essential for HDR bracketing. Since you’ll be taking multiple shots with varying exposures, it’s important that your camera stays in the same position to avoid any movement between frames. This ensures a seamless final image when you combine them later.
3. Use Bracketing Mode (or Manual Exposure) 📊
Many modern cameras come with an automatic bracketing mode, which will automatically take three or more shots with varying exposure levels. If your camera doesn’t have this feature, you can manually adjust the exposure settings for each shot.
4. Determine the Number of Brackets 🔢
HDR bracketing typically uses three to five exposures—one underexposed, one properly exposed, and one overexposed. Some photographers go as far as seven or more exposures for extreme lighting conditions. Start with three and experiment based on the scene’s dynamic range.
5. Capture the Scene 📷
Take the photos with different exposures, ensuring each shot is as steady as the last. When shooting indoors, you may need to use a slightly slower shutter speed to capture more detail in the darker areas. Outdoors, you’ll likely use faster shutter speeds to avoid overexposure, especially when shooting during bright sunlight.
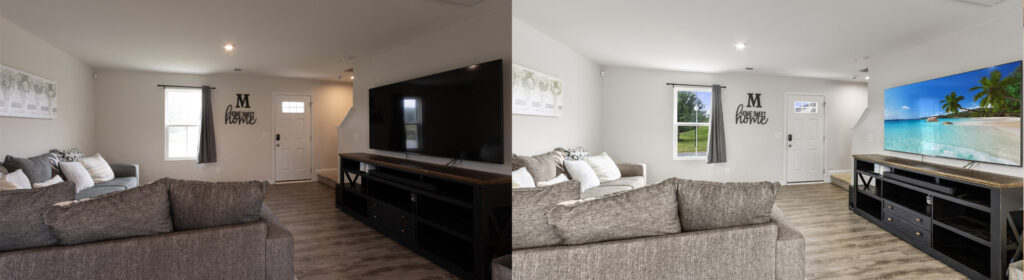
Indoor Image Example: Bright Living Room 🛋️
Imagine you’re photographing a well-lit living room with large windows. The sunlight is streaming through, illuminating the room, but it creates a problem for the dark corners and interior details. Without HDR bracketing, the result would either have blown-out windows or dark, murky shadows.
To tackle this, follow these steps:
- Step 1: Set your camera to manual mode, choose an appropriate aperture (f/8 works well for most interiors), and adjust ISO to 100 to minimize noise.
- Step 2: Use the bracketing mode to capture a range of exposures: one that’s underexposed to protect the bright windows, one with normal exposure for the interior, and one overexposed to bring out details in the shadows.
- Step 3: Ensure that your tripod is stable, and don’t rush the process. The goal is to get a well-balanced shot that can be merged later.
Once your images are ready, Photopandas can work its magic, adjusting for any color imbalances and enhancing the final result to ensure a sharp, vibrant photo with balanced lighting.
Outdoor Image Example: Sunset Property View 🌅
Shooting outdoors can be trickier, especially when you’re capturing a property during golden hour, when the sky is glowing and the house is bathed in warm light. Without HDR bracketing, you might end up with a beautifully colored sky, but the house could appear too dark or silhouetted.
Here’s how to approach this:
- Step 1: Set your camera to aperture priority mode (f/8 is a good starting point). Adjust the ISO to 100 to reduce noise.
- Step 2: Use bracketing to capture three exposures: one to properly expose the sky, one for the property, and one for the darker shadows.
- Step 3: Take the shot, ensuring the camera is stable on the tripod to avoid any motion blur.
Once Photopandas receives your HDR shot, we can process it to blend the exposures seamlessly. The result will be a stunning image with vivid colors in the sky and crystal-clear details of the property.
Tips for Perfect HDR Bracketing
- Essential Equipment 🧰: A sturdy tripod is a must-have, especially when shooting in lower light. A remote shutter release can also help avoid camera shake when pressing the shutter.
- Common Mistakes to Avoid 🚫: Don’t rely on auto mode to adjust your exposure settings. Manual control gives you more creative freedom. Also, ensure your bracketing settings are consistent to avoid mismatched exposures.
- Editing Workflow 🖥️: Organize your bracketed shots by exposure, and use software like Adobe Lightroom or Photopandas’ specialized tools to merge the images. Photopandas excels at HDR blending to give you a perfectly balanced shot every time.
Why Photopandas for Real Estate Photo Editing?
At Photopandas, we understand the intricacies of HDR photography and the importance of perfecting each shot. Our photo editing services can take your bracketed HDR images and enhance them to their fullest potential. Whether it’s adjusting the color balance, removing unwanted objects, or fine-tuning the exposure, we ensure your real estate photos capture every detail.
Check out our portfolio to see the transformation we can bring to your images. And for a limited time, real estate photographers can enjoy exclusive discounts on HDR editing services!
Conclusion
HDR bracketing is a powerful tool that every real estate photographer should have in their arsenal. By following these tips and steps, you can create breathtaking images that highlight every detail of a property, from the well-lit interiors to the stunning views outside. And when you trust Photopandas to handle the post-processing, your images will be refined to perfection, ready to impress potential buyers.
Ready to take your real estate photography to the next level? Contact Photopandas today and let us help you create stunning, professionally edited HDR images! 🌟